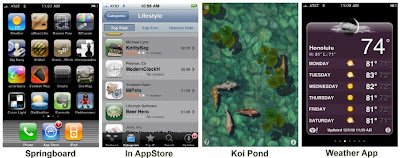
 So, how do you do screen shots on your iPhone or your iPod Touch? The hard way is to attach your iPhone to your Mac, fire up XCode, open the Organizer window and use the screen shot tab. The problems with this method are obvious:
- You can only do this with a Mac.
- Your iPhone/iPod Touch has to be tethered to your computer.
- You have to load XCode and bring up the Oganizer window.
The Better Way
A nice nifty feature that I found out about for my iPhone to do a screen shot (a little bird told me that this feature was available starting in iPhone OS 2.2):
- Navigate on your iPhone/iPod Touch to a screen you want to create a screen shot of.
- Hold down the Wake/Sleep button on the top of your iPhone.
- While holding down the Wake/Sleep button, press the Home button (just below the screen) and release both buttons.
- The screen will flash white, and, if the phone is not in silent mode, you will hear an SLR camera type noise.
- Any screen shots you took this way will now be in your iPhone Photo Album! Just go into the Photo Album app like you normally would, and go to the end of your photos!
Using Those Photos
If you sync up your phone on a Mac when you dock, the photos will be synced into iPhoto and then you can go from there. But another quicker way that needs no connecting and no Mac is to email the photo to yourself.
 Get into the Photo Album app on your iPhone and bring up the desired screen shot.
- In the lower left hand corner will be a button for sending emails. Tap it!
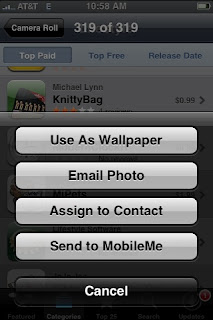
- You will see your screen look like something to the left. Tap the Email Photo button.
- You will see an email be generated with the screen shot in it.
- Make sure that the from and to email addresses are there and accurate. And Send!
Finally, on your computer, open the email and save the picture attachment to your hard drive. You may want to tweek it in a graphics program such as Photoshop.
Now you can:
- Add the screen shot to a document such as a Word document.
- Upload it and add it to a blog post (like I'm doing here).
- Upload it to your web server, etc.
In Closing
Finally, I leave you with one funny side effect of doing screen shots like this:
If you are browsing those screen shots in the Photo Album, you just might get confused and forget that you are in the photo album and try pressing "buttons" and wonder why they don't work! This can be good for pulling some pratical jokes on your friends!


simple but it works! Thanks Mr Allot ;-)
ReplyDeleteE
Surprised I didn't know about this sooner, thanks for the article.
ReplyDelete